|


 |  |
|
| |
 | Alpinism | Arta cultura | Diverse | Divertisment | Film | Fotografie |
| Muzica | Pescuit | Sport |
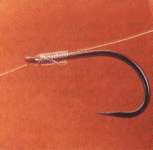
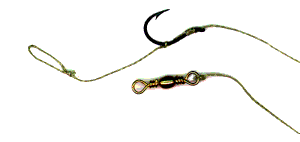
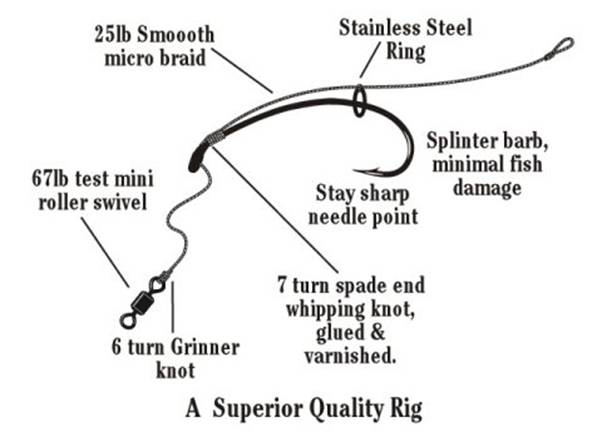
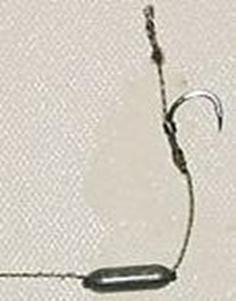
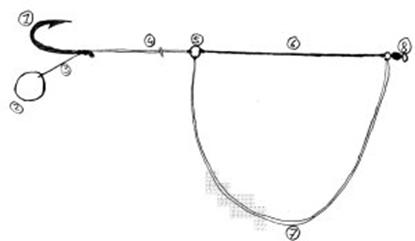
La sfarsitul anilor '70, Kevin Maddocks si Len Middleton au inventat hair-rig-ul. Nu a fost asa, un vis care i-a aruncat frenetici noaptea din pat, ci era nevoie de el, pentru ca - in urma unor cercetari serioase - s-a observat ca, scuzati!, crapii au devenit reticenti in a manca momelile atasate de linia de pescuit. Si s-au gandit sa puna momeala alaturi de carlig si nu pe carlig!
Mai mult, "legenda" spune ca atunci cand au inceput sa pescuiasca astfel, ei si-au scos manivelele mulinetelor si, cu pick-up-ul mulinetei ridicat, au dat posibilitatea crapului sa "ia linie", pana cand puneau ei manivela la loc si puteau sa "intepe"!
Evident, toata aceasta treaba este strans legata de evolutia momelilor, mai exact de trecerea de la graunte, particule, viermi, rame si, mai ales, pasta, la momelile fierte, adica boilies. Evident, daca poti pune o rama, un vierme sau sa modelezi pasta pe carlig, un boilie tare ca piatra, nu.
A aparut, astfel, hair-ul.
Practic, este vorba de a atasa un "hair" (pe romaneste, fir de par - de fapt, a fost si materialul utilizat de Maddocks si Middleton) de carlig si, apoi, de a monta momeala pe acest fir.
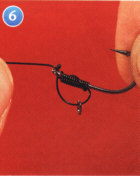
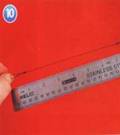
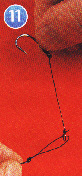
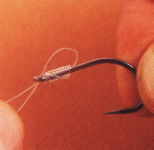
Cel mai simplu de realizat este folosind un chiostec de fir textil si un carlig cu ochi, impuscand doi iepuri dintr-un foc: legam carligul de chiostec si obtinem si hair-ul!, ca in figura.
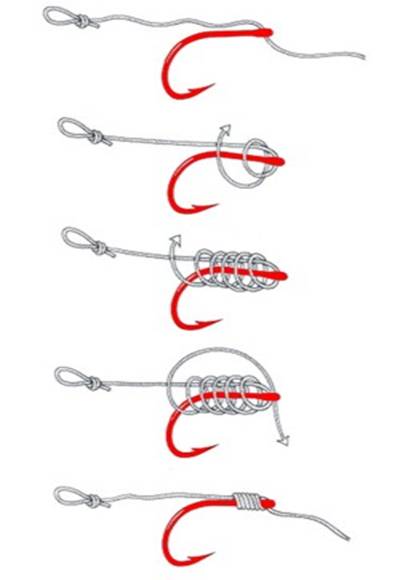
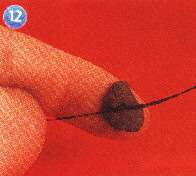
Acest nod (fara nod! sau knotless-knot) este cel mai des folosit de crapisti, din mai multe motive:
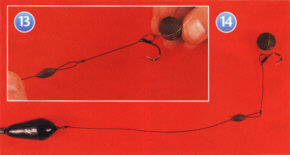
Am aratat, mai sus, hair-rig-ul cel mai folosit, nu pe cel "clasic".
Cel clasic presupune simpla legare a unei momeli, prin intermediul unui fir (de regula, se foloseste ata dentara - dental floss), de curbura carligului. Cum eu nu folosesc acest mod clasic de atasare a momelii, nu il recomand.
![]() Technical
Technical
Jim Foster
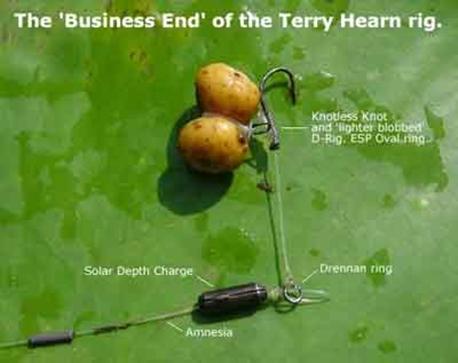
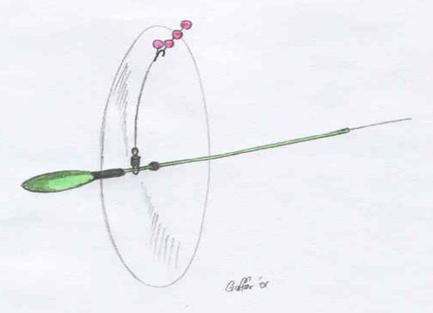
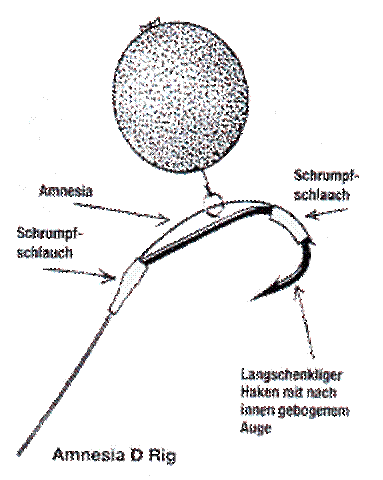
The 'D' rig is one of the most famous carp rigs ever devised. Used extensively during the late 80' and early 90's, its use has probably declined in the last few years due to the popularity of the knotless knot. That was until some clever chap devised a way to integrate the sliding 'D' into the knotless knot.
First lets look at the theory behind the 'D' rig. Basically it is called a 'D' rig because a loop of stiff nylon or Amnesia is tied to the back of the hooks shank in a 'D' shape. The 'D' can either be whipped into position with thread and glue as if you were tying a trout fly, or using a variation of the knotless knot.
In the process of tying the 'D' you should thread on a sliding ring. In the pictures that accompany this article we are using an ESP oval rig ring - though any simple stainless rig ring will do the job. The boilie is then tied to this ring, therefore making it free to slide up and down the 'D'. The idea is to give the bait a natural kind of movement, so that in the water it behaves in a similar fashion to a free offering.
When the rig is taken into the carp's mouth, I've heard it said that the carp can eject the boilie (which slides down the 'D') whilst leaving the rig in a place to find a hold. I am not so sure about this myself as I think the carp is more likely to eject the hook and retain the bait in it's mouth; not realising that the food is attached to the hook.
In reality all that matters is that the rig works, end of story. No one really knows what goes on inside a carps mouth as it takes in a hook bait and then tries to eject it. All you do need to realize is that this presentation is very good and works a treat, especially when used with a pop-up. Top names that have used this rig in the past include Rod Hutchison and Terry Hearn. They can't all be wrong can they?
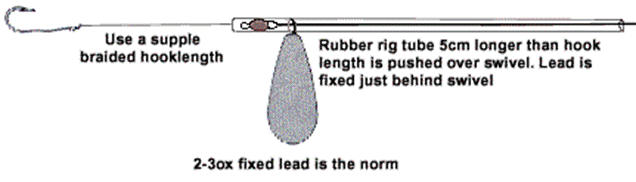
You'll notice that there are two sections to the hook length, making it a 'combi link'. These are ties together using a loop and another sliding ring. This technique should only be employed with a buoyant, popped-up boilie; as the effect gained will not be so pronounced on a bottom bait.
The idea once again is to give the hook bait movement and flexibility underwater. On a hard lake bed, the fact that the hook bait is connected to a couple of inches of stiff link and a loop mean it can waft around naturally as the carp feeds nearby.
There are quite a few hook link materials on the market that you can use for this rig. If you wish you could make the section of hook link between the bait and the loop supple - a braid for instance. The rest of the hook link should then be stiff. Alternatively the whole link can be made from a stiff material. We'd recommend Amnesia, Korda IQ, Fox Casper and ESP Stifflink.
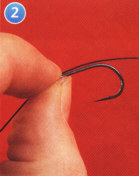
How To Tie The 'D' Rig
The 'D' rig is one of the most famous carp rigs ever devised. Used extensively during the late 80' and early 90's, it's use has probably declined in the last few years due to the popularity of the knotless knot. That was until some clever chap devised a way to integrate the sliding 'D' into the knotless knot.
|
Get your materials together and ready, this makes things easier when tying the rig. We'll be using Amnesia for photographic purposes, though it can be used in practice too. Take the hook for your choice and thread it down the hook link. Don't tie the loop in the end of the link, you won't need one. Get ready to tie the knotless knot. |
|
|
|
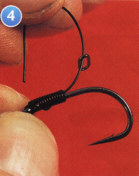
Carefully tie on the hook using the knotless knot (see how to tie the knotless knot). Notice where the whippings stop - just under half way down the hooks shank. After you have tied the knot, bend the tail back and thread a sliding rig onto it as shown in the picture. This is where you will tie your boilie. |
|
|
|
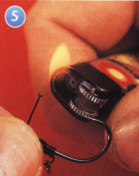
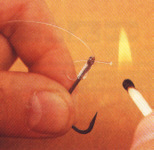
Now comes the clever part. Thread the tag end back through the hook's eye, the carefully burn it using a cigarette lighter. This creates a blob that stops the 'D' unravelling itself. Here is the finished rig complete and a boilie ready to be attached. You can see how the lob works. Clever, eh! |
|
|
|
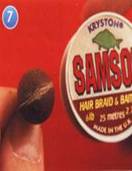
Now it's time to look at tying the boilie on. There is no right way to do this, but it is advisable to use a good tying material - like Krystons Samson, for example. One alternative is to create a groove in your chosen hook bait. Then carefully tie your boilie on as shown. Make sure you tie it as securely as you can - you don't want it coming off. |
|
|
|
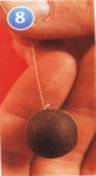
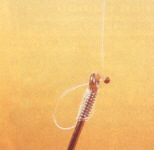
Thread the braided hair through the sliding ring as demonstrated, and secure the boilie in place. You can use some rig glue if necessary. Now for the rest of the hook link. Tie a loop in one end of the link, complete with a sliding ring. Tie a swivel onto the other end of the link which should be about 8 inches long. |
|
|
|
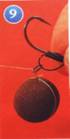
Now connect the hook section of your hook link to the loop. This part of the rig should be 2 or 3 inches long. Obviously there is room to experiment. This rig should be used almost exclusively with pop-ups. To balance the pop-up, simply mould some putty around the knot of the loop as shown. |
|
|
|
The rig is now finished. Here is the hook bait section, as it should appear just before casting. How can any self-respecting carp resist that! Finally the lead is added. Here it is an inline lead, but you can use this rig with a swivel lead, tubing and a safety bead type set-up. It is up to you. |
|
This feature is taken from the Jan 2000 issue of Total Carp Magazine. For more information on the magazine and current subscription offers please click on the banner below
![]() Technical
Technical
Jim Foster
The stiff rig has been around for almost a decade. Originally thought up by Mike Kavanagh, it has proved to be the downfall of many carp - particularly on waters that are, or were, highly pressured by anglers using braided hooklinks.
Before we start, just a quick word about the materials we will need. Basically I weave the hair material into a knotless knot and secure it with superglue. One of the best glues on the market at the moment is Kryston Bondage. It's water resistant and rubberised, plus it sets in seconds. I can recommend it for any rig tying you might do.
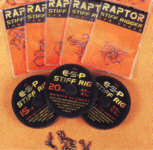
The hooklink I am using here in the photographic sequences is Black Amnesia. I don't actually use it for fishing these days as it has been overtaken by companies like Fox, ESP and Korda who produce specialist stiff links designed solely for carp fishing (Amnesia was designed as a shooting head fly line). One of these , the ESP version has particularly caught my eye. Korda's IQ also fits the bill for this type of rig, as does Fox Casper in the heavier breaking strains.
WHY DOES IT WORK? On the face of it, the stiff rig looks crude to say the least. Why it works has been the subject of considerable debate. The thinking behind it is that, as the carp sucks in the boilie, the hook link material does not bend; therefore making it harder for the carp to eject the hook when it blows out.
Try and think of it like this. A carp's natural feeding process involves the separation of food items from non-food items within the mouth cavity; with silt, gravel and other inedible material being filtered and expelled back through the mouth or gill rakers. The hook, of course, constitutes something inedible, so the carp tries to eject it. It's important here for me to emphasise here that I do not believe a carp knows what a hook is, what it does, or for that matter what a rig is. The fish is not trying to shed the rig knowing it is in danger of being caught, it's simply trying to expel a non food item.
Mostly is succeeds and the hook along with the boilie fall back to the bottom with the fish being none the wiser for it's near miss. Fortunately sometimes it does not miss and the hook finds it's hold. It is now that the stiff link comes into play. It's designed to combat the ease that the carp can eject a hook, and is a system that can work very well - especially on waters where the carp feed hard, and have limited knowledge of stiff hook link materials.
I hope that you understand my thinking behind all this. Whether I am right or wrong we will probably never know; but one thing I always emphasise to people is precisely that - theory. Noone knows for sure how each individual carp feeds and how the rigs behave amongst the rubbish on the lakebed, or whilst in the carps mouth. And, no matter how modern your rig, it's not going to work if the carp don't want to eat your bait.
How To Tie The Stiff Rig
The stiff rig has been around for almost a decade. Originally thought up by Mike Kavanagh, it has proved to be the downfall of many carp - particularly on waters that are, or were, highly pressured by anglers using braided hooklinks.
On the face of it, the stiff rig looks crude to say the least. Why it works has been the subject of considerable debate. The thinking behind it is that, as the carp sucks in the boilie, the hook link material does not bend; therefore making it harder for the carp to eject the hook when it blows out.
|
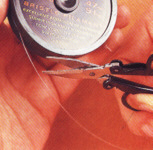
STEP 1 - Here's the gear you'll need - some Stiff Rigger hooks and some of the new ESP Stiff Rig material. STEP 2 - Take a length of the Stiff Rig - how long is up to you, it all depends on what you are trying to achieve. |
|
|
|
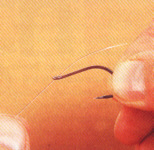
STEP 3 - Thread the end of the link through the Stiff Rigger hook's eye. STEP 4 - Now whip the hook onto the line using a knotless knot. - see how to tie the knotless knot for more details |
|
|
|
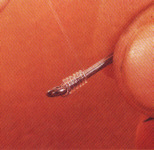
STEP 5 - Straighten the knot out and your hook should be sitting like this on the stiff link material. STEP 6 - Pull the hair back through the eye - do not tie a loop on the hair. You're creating what is called a 'D' rig here. |
|
|
|
STEP 7 - This is the tricky bit - you need to carefully burn the tag end. A blob of line will appear, that will prevent the 'D' coming apart. STEP 8 - The finished rig should look like this. You can alter the angle of the hook simply by pinching the hook link - it's that stiff! |
|
|
This feature is taken from the Nov 1999 issue of Total Carp Magazine. For more information on the magazine and current subscription offers please click on the banner below
![]() Guest
Articles
Guest
Articles
Jim Foster
Withy Pool is a venue steeped in history. Fished in the 1960s by the likes of Dick Walker, the pool has long since been a breeding ground for thinking anglers to experiment with their carp fishing. However, Withy has never been a prolific venue, holding little more than 20 carp altogether at any one time. A large proportion of these fish are 30lb plus though, with some being more than 40lb.
Today, after a flirtation with day ticket anglers, Withy is run as a syndicate. Most will struggle to catch more than one fish in a season. Some will blank all year. But for those who know their stuff, a few thirties and maybe a forty are on the cards.
Make no mistake about it; Withy can be a hard venue. The carp it contains have loads of natural food to go for, plus they're subjected to pressure from some of England's best carpers. Yet Withy's cleverer inhabitants can easily go a year or more without being caught.
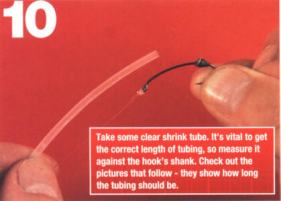
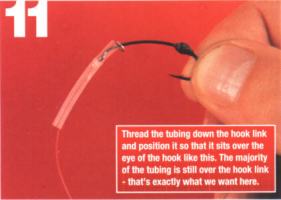
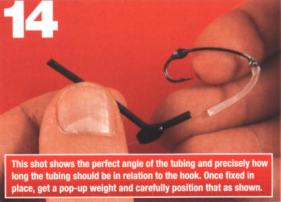
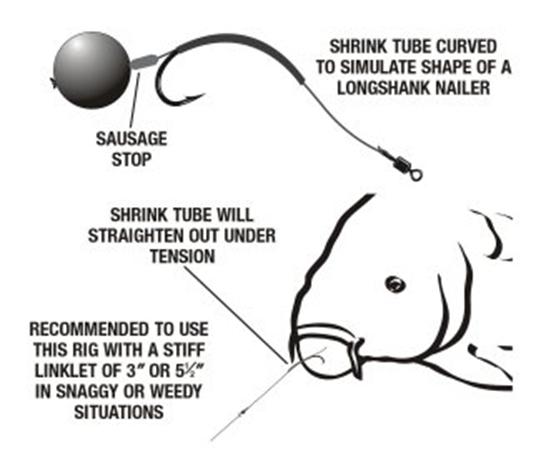
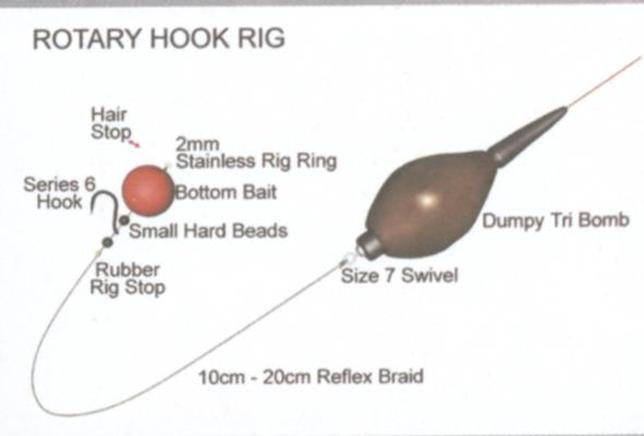
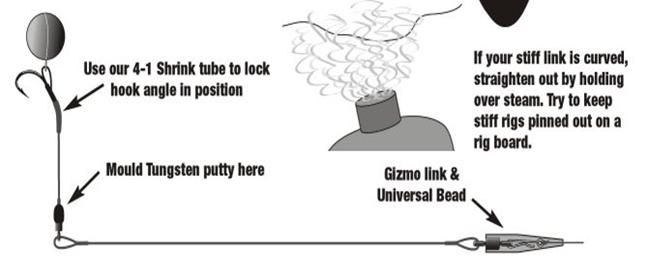
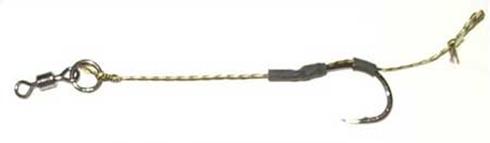
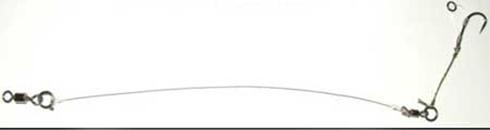
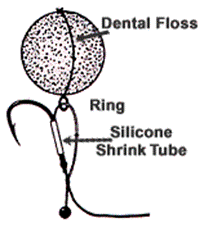
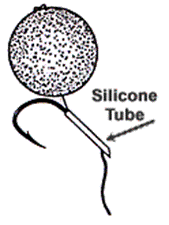
It's one of the few venues I know where you really do need to get every part of the equation tight. And that includes rigs, so I'm going to take a look at a set-up that was devised in part by former Withy Pool owner Kevin Maddocks. It takes the old Withy Pool Rig and modifies it a bit, utilizing a long-shanked hook, a sliding ring and an acute bend between hook and hook link brought about by the clever use of clear shrink tubing.
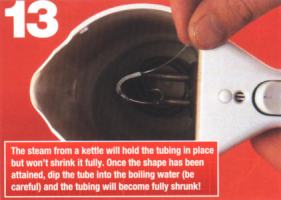
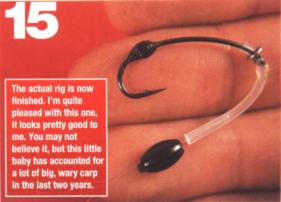
The bend in the shrink tube is the thing that strikes you when you look at the rig for the first time. You think to yourself, 'that can't possibly work,' but I assure you it does! In fact, I've seen this rig in action on quite a few occasions and can vouch for its effectiveness. It's especially good with pop-ups, although Kevin Maddocks uses it with bottom baits (I'm thinking specifically here of the Carp Nuggets he's caught so well on in the last 18 months or so).
Even though it appears that the hook point is well obscured, the rig seems to suit the way carp feed and will catch them out time and again. I remember having a conversation with Steve Renyard, a man who should take most of the credit for the design of the original Withy Pool Rig, about a session he had on Withy when he used the Mark I version for the first time.
I think he had a number of takes in a single trip in a spot that had produced next to nothing for months. This success rate continued and Steve went on to catch most of Withy's residents in a very short period
Obviously, the rig wasn't the sole factor behind his success, but in his mind, the edge of being the first to use such a radically different rig helped him catch those fish.
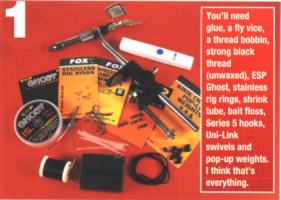
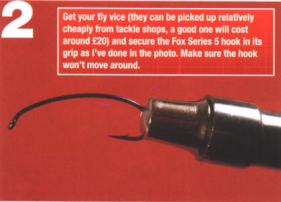
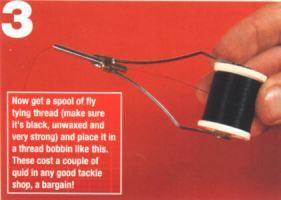
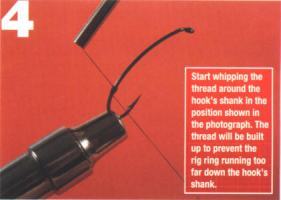
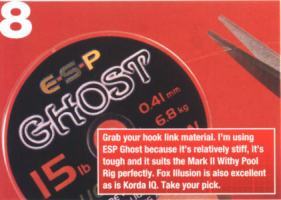
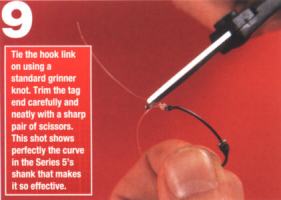
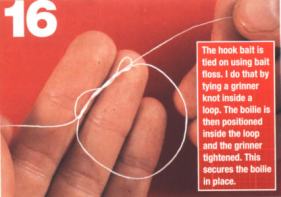
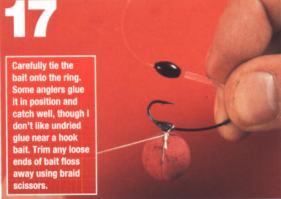
So if you fancy trying this rig out, you'll need to get yourself some fly-tying thread and a fly vice. You'll also need some Fox Series 5 hooks, a fairly stiff fluorocarbon hook link like ESP Ghost, Korda IQ or Fox Illusion, some clear shrink tube, sliding rings and some bait floss.
Most carp hooked on the Mark II Withy Pool Rig are hooked securely in the middle of the bottom lip. This positioning of the hook leads me to believe that the carp clamp their mouths over the pop-up, with the bottom lip possibly being caught between the hook and the shrink tube. On ejection it's argued that the shrink tube acts like a spring that helps pull the hook down, quite forcibly, into the fish's bottom lip.
However it works (we'll never know for sure!), the fact is that it does. It has taken some waters apart in the last two years. So tie it up carefully and try it out. You too could find yourself upping your catch rate - but please remember that no rig is any good unless you're using a bait that the fish want to eat!
Got that? Good! Then let's get tying.
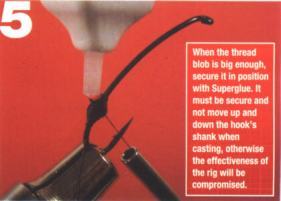
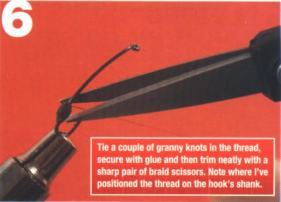
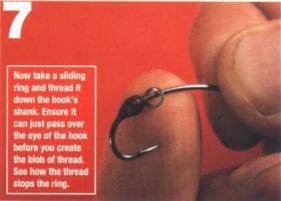
How To Tie The Withy Pool Rig
|
|
|
|
|
|
|
|
|
|
|
|
|
|
|
|
|
|
|
|
|
|
|
|
|
|
|
This feature is taken from the Sept 2000 issue of Total Carp Magazine.
Carp rigs have changed immensely during the last few decades. Since the early days of floating crusts and parboiled potatoes, more and more anglers have begun to specialise in catching carp, new specialist venues have appeared on the scene and carp rigs have become an important element in catching carp today. With this increase in popularity comes an increase in the amount of pressure on our waters. The fish become increasingly wary and to carry on catching specimen carp, we must continually come up with more and more ways to outwit them, and carp rigs play an important role.
The key to this is in bait presentation and to achieve this, we must be able to create and tie our carp rigs correctly. This section is dedicated to explaining the many types of carp rigs available today and to show you just how to get them right.
With the right carp rig and the right bait, presented correctly in the right place, you will stand a much greater chance of putting that personal best on the bank. We will continually add to these pages as new advances in the rig scene are discovered, and if you know of a good carp rig that you have tried and caught carp with, then let us know. Tell us how it is tied and why you think it works and we will add it to the site.
Ledgering rigs
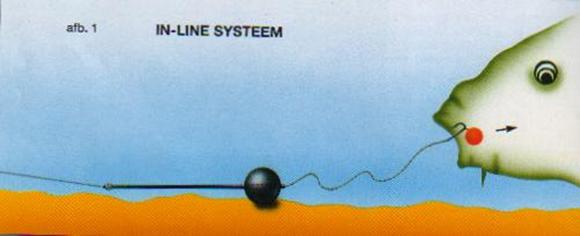
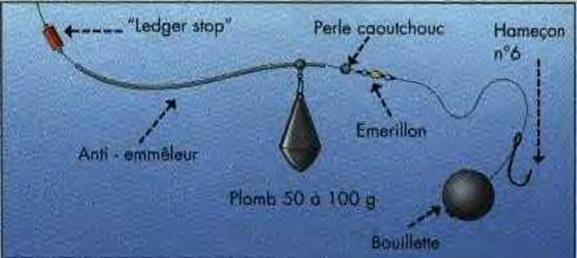
So, what are the basic types of rigs? Years ago, the only form of ledgering I knew was the sliding ledger. This basic rig was simply a hook on the end of my main line with bait directly attached to it, with a sliding pear shaped lead or drilled bullet stopped a short distance from the hook by a single split shot. This was occasionally upgraded to a swivel to stop the weight, usually when I wanted to use a lower breaking strain line on the hook length and needed some way of attaching it. The carp would take the bait, swim off with it and pull the line through the weight, thus registering a bite. It was a very basic rig, but it used to catch me fish. The first drawback of this rig was that the split shot would sometimes come off, causing me to hook a lead weight if I was lucky, or it would damage the line to a stage where it would break on hooking a fish. This of course was another good reason to replace the shot with a swivel. This basic sliding ledger rig will of course still catch fish today, and I still use it where a simple technique is sufficient
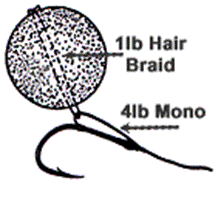
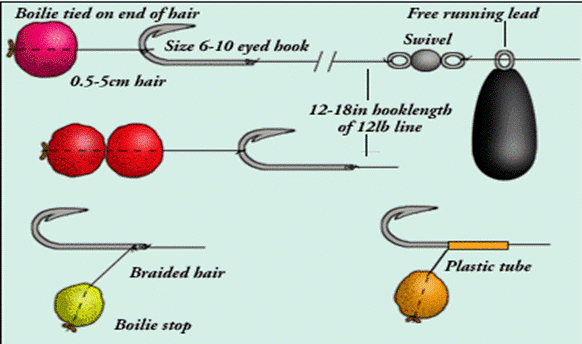
Carp though became a bit more clever, and on picking up the bait, sensed that something was wrong and let go before registering a single movement back on the bank. Carp could also feel either the line itself as they picked up the hookbait, or the resistance of the line due to monofilaments springy nature. As the carp takes its food straight into the back of its mouth where it is crushed, anglers believed that they could also feel the hook and would eject the bait. And so the hair rig was developed. This involved taking a very thin piece of line and attaching it to the end of the hook. The bait was attached to the hair so that when a carp passed the bait into the back of its mouth the hook was still at the front near the carp's lips. Anglers also started to use a finer trace length of a softer material, such as Dacron, believing that the fish wouldn't feel resistance from the trace. This helped a lot and today many rigs are still tied with these basic principles, using hair rigs and soft trace materials.
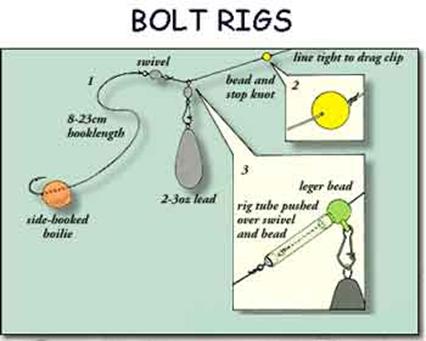
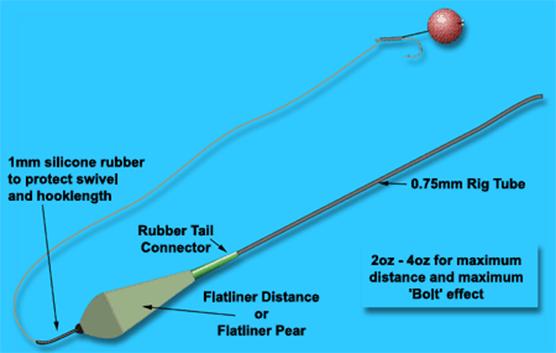
Typically the hair rig is used with a 'bolt' setup, where a heavy weight is fixed onto the line. As the fish starts to feel the weight, it panicks and moves off suddenly, thus setting the hook (most of the time).
You can tie your own hair rigs quite easily with a length of 25 - 30 lb. test superbraid (which has the same diameter as 6 - 8 lb. test monofilament), some swivels and super-sharp size 8 to 4 hooks, like the 'octopus' style from premium hook-makers like Gamakatsu, VMC, Mustad or Owner, to name a few. Superbraid is used because it is soft to the touch, and doesn't coil like mono. Instead of buying a whole spool (it's expensive stuff), you can just purchase a length (20 feet or so) of it from a tackle shop that spools reels
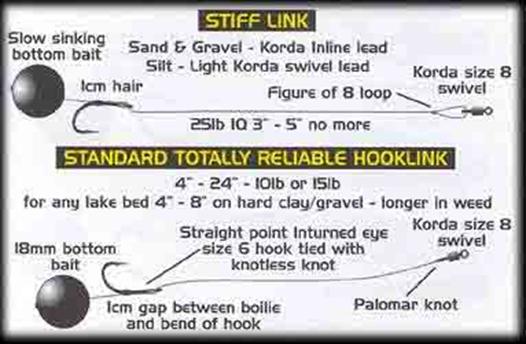
Then it's simply a manner of tying a snell knot to the hook, leaving several inches on the tag end. The snell knot is perfect for this rig, as the tag end lies parallel to the shank. The tag is then tied to the shank where the bend starts with a simple overhand knot. The length of the tag can be varied to the size of the boilie or number of corn you wish to use. The end of the tag is finished off with a simple overhand loop. The other end of the leader is then tied to a swivel with a palomar knot (other standard knots have been known to slip with superbraids).
Bait Needle
To thread the corn or a boilie onto this tag end, one uses a bait needle, which you can also make yourself. Simply take a large sewing or tapestry needle, and with a pair of wire cutters, clip out a section of the eye, leaving a j-shaped hook, as shown below.
For the handle, use a short section of dowel rod about the diameter of a pencil, bore a small hole in the end, and superglue the pointed end of the needle into the hole. You can even use the needle as the drill bit.
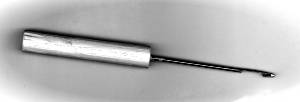
The handle can then be dipped in latex or lacquer to seal the wood. Now you're ready to bait the hair rig.
Baiting the Hair Rig
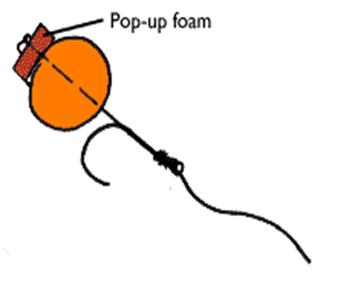
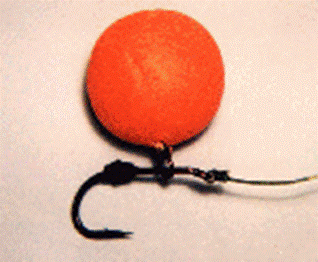
For field corn, simply thread the needle through the corn. A boilie is threaded on exactly the same way. To make it a 'pop-up' rig, sandwich a piece or two of packing foam in between the corn, which will cause the bait to float up from the bottom. This makes your offering the most visible and accessible, especially in a bed of chum.
Make sure that there is enough foam to float the bait. Then hook the loop from the end of the hair rig, and slide the bait on.
To lock the bait on, insert a stopper in the loop, and slide the bait back against the stopper. Almost anything can be used as the stopper - I use a tiny piece of pine needle. The height of the popped bait can be adjusted by adding a split shot to the leader, or by the length of the leader itself.
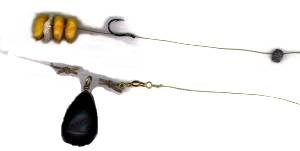
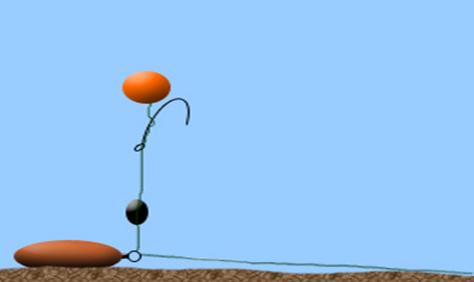
The Bolt Rig
To set up the bolt rig, bolt or fix a heavy weight (about a 3 ounce bell sinker) onto the main line. This can be done by tightly knotting a rubber band ahead of the weight. I also knot a rubber band behind the weight next to the swivel to keep the sinker from banging on the knot or slipping onto the swivel. Then trim the ends of the rubber band.
A heavy weight is necessary to set the hook, when a carp 'bolts' away from the tension. I've heard some anglers use a lighter weight (1 - 1.5 ounces) and firm up the hook set themselves after a strike. This is the fundamental setup, with a multitude of variations used, like different sinker options, hooks, etc. I'm a 'do it yourselfer,' and this is the way I figured the rig must be tied, and it's worked for me.
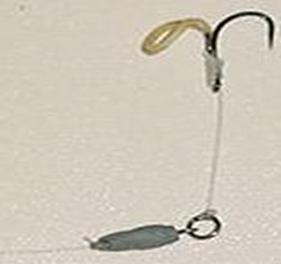
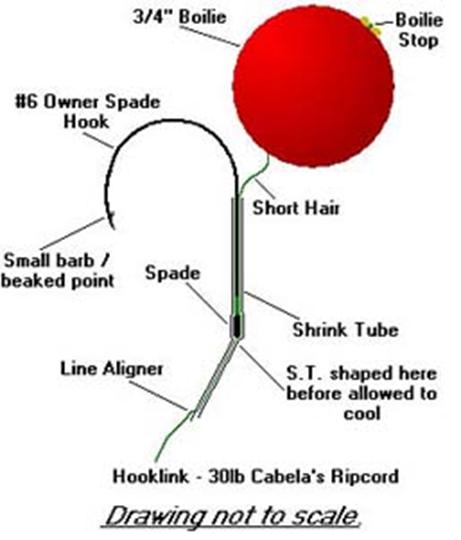
The Line Aligner
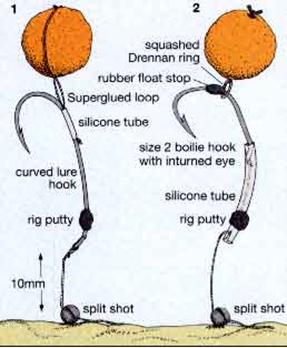
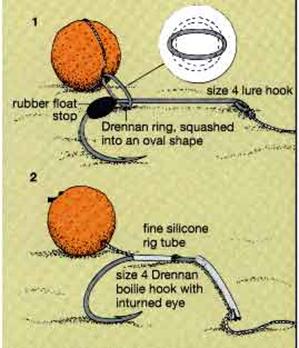
The linge aligner is basically a hair rig with an improvement. Heat Shrink tube has been applied around the shank of the hook. It is left sticking out past the eye of the hook. Instead of the line also passing out of the tubing, it passes out through a small hole made in the inside of the shrink tube. This makes the hook always flip over so that it faces downwards when the carp picks it up. Try dragging it across your finger, you'll see that it hooks you almost every time. Personally I like to use the line aligner as often as I can when I'm using an ordinary hair, but it's up to you. You have to decide which rig you feel most confident in using
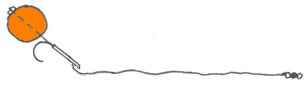
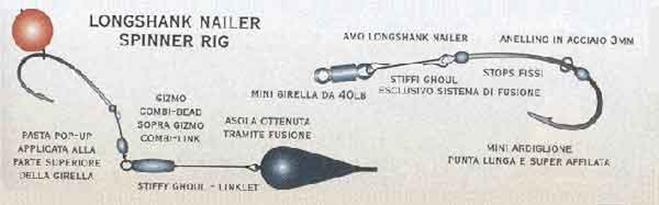
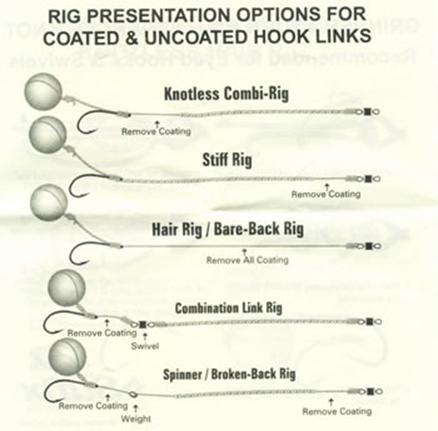
The D-Rig
the drig has a loop at the shank of the hook which has a rig ring on it. The boilie is normally tied on to the rig ring using bait floss or ordinary dental floss, although you can tie a hair to the rig ring and mount the bait on that. D-rigs really need to be made from monofilament so that the ring sticks out instead of collapsing inwards and ruining the effect of the rig. Of course, you could always use Kryston's Snake Bite and strip off all the coating from after the hook to the swivel, this would let you make the rig out of braid without ruining the effect of the rig. To make the ring I tie a knotles knot but instead of tying a loop to make a hair, I leave a long tag end. I tie the knotless-knot as normal and when I've finished I pass the tag end through the eye of the hook (after sliding on a rig ring). Then I get a match and carefully burn the end sticking out through the eye so that it forms a 'bobble' on the end which cannot pass back through the eye. I continue to burn it down until I get a loop of just the right size. One product which helps in the construction of this rig is Solar's D-Riggers. The D-Rig is a pop-up rig and only really works with boyant baits, so you will need something to counter-balance the pop-up (not illustrated).

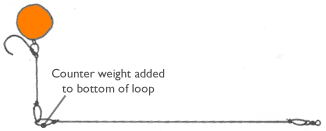
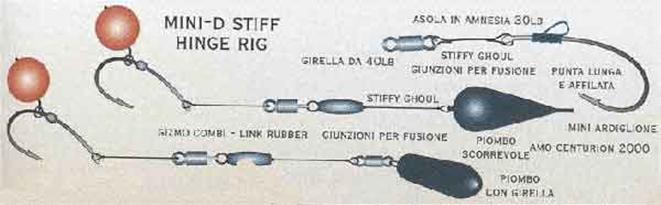
The Hinge Rig
The hinge rig is another pop-up rig. Made famous by Terry Hearn, the hinge rig is made from stiff monofilament (my personal favourite material for stiff rigs is ESP Stiff Rig Bristle Filament) A hinge is created by two interlocking loops on either piece of mono. A loop is also used to attach the swivel, but flexi-ring swivels perform the same task as the loop. A good knot for tying on swivels using stiff mono is the two-turn blood knot, it doesn't tend to mess us thick line like grinner and palomar knots can. This rig is normally fished with a boyant bait, so if you use one then remember to add a counter weight. As I have pointed out in the diagram, the counter-balance should be added to the bottom of the loop so that the hook always ends up pointing away from the swivel (as you can see in the diagram). Although you don't have to use a D-rig set up with this rig, I think it helps to let the bait move more freely when using stiff mono.
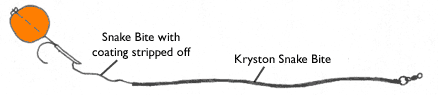
Snake Bite Rig
Here's a rig which I use quite a lot and you can make with Kryston's Snake Bite. The stiff part of the rig makes sure the rig straightens out as it lands on the bottom and helps to avoid tangles. An inch to two inches of the snake bite before the hook has been stripped off, this lets the bait behave naturally in the water. If I decide to use a pop-up I put the counter-balance on the end of the stiff part just before the point where it is stripped off.
Critically Balanced Rig
This is a rig I have used quite a lot in the past. When critically balancing your bait, the aim is to get it as light as possible so that is is only just being held down by the weight of the hook. The theory is that if a carp decides to taste your bait, it is sucked straight into the carp's mouth before any other bait, and hopefully the hook will then become caught in the carp's mouth. This is to try and trick the carp that are not necessarily attempting to eat the bait, but are just tasting it or sucking in your free offerings. Start with a piece of rig foam that is a bit too big and makes the bait float, then cut off small pieces until it only just sinks in the water. You don't have to use boilies, I have fished it with Pepperami which you'll find is very boyant and requires little foam. Fishing this rig over a bed of freebies, particles or with 'the method' can be effective because the carp might inadvertently suck in your bait whilst foraging for the particles.

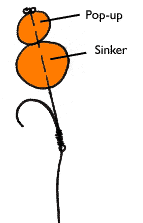
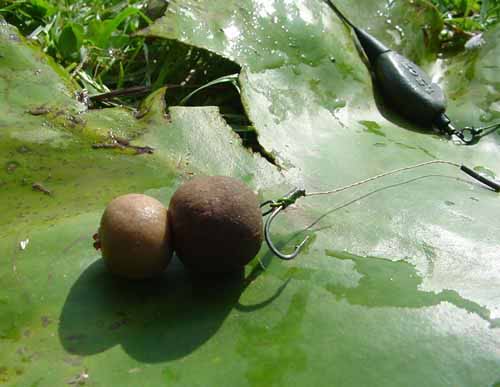
The Snowman Rig
This rig is a variation of the ciritically balanced rig. You get two boilies, one which floats in water and one which sinks. By putting the sinking bait onto the hair below a floating bait, you should find that the pop-up sits at the top with the sinker holding it down. It is possible to achieve a situation whereby the net boyancy of both baits and the hook leaves the setup 'critically balanced' (see above). This can be achieved by changing the size ratio of the boilies, pushing short lengths of lead wire into the bottom bait to decrease boyancy (I think you can buy wire intended for this in tackle shops), or adding foam above the pop-up to increase boyancy. I like to use boilies of the same sort for this but I suppose there's no reason why different flavoured boilies couldn't be used in combination.
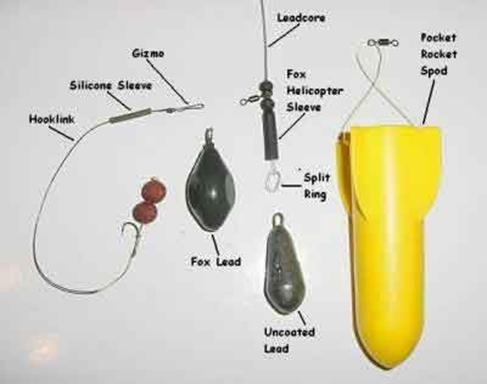
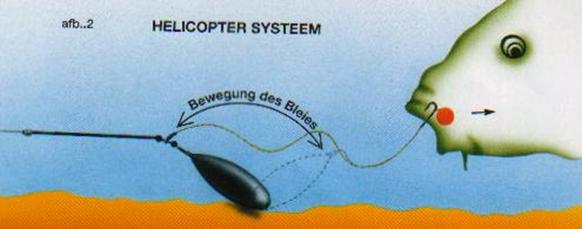
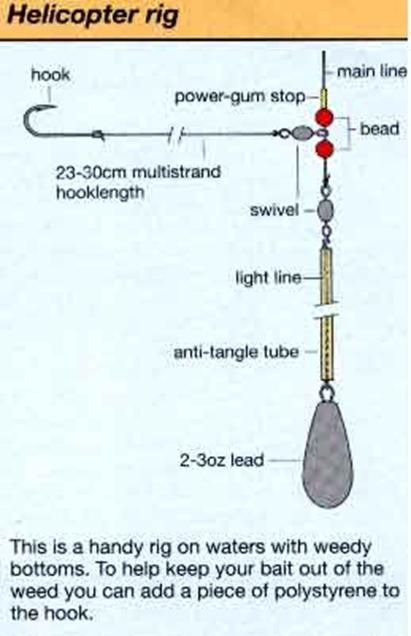
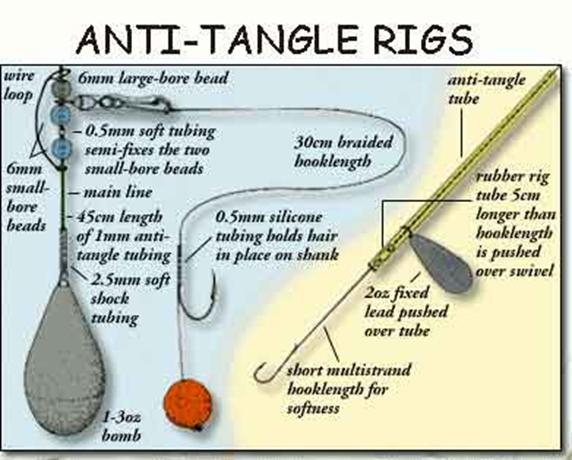
The Helicopter rig
The Helicopter rig was originally used for sea fishing and later adapted for carp fishing because of its anti-tangle properties.The rig was named the helicopter rig after its helicopter blade like motion in flight.The baited hook-link rotates about the main-line axis by the use of the loose fitting hook-link swivel, usually on anti-tangle tubing or lead-core. The Helicopter rig is probably the most commonly used rig when trying to achieve extreme distances because of its anti-tangle properties and it's aerodynamic set-up. The Helicopter rig is best used with a two or three bait 'Stringer', a 'Stringer' is usually free offerings of your hook-bait that are threaded onto dissolvable P.V.A. string and tied to your hook
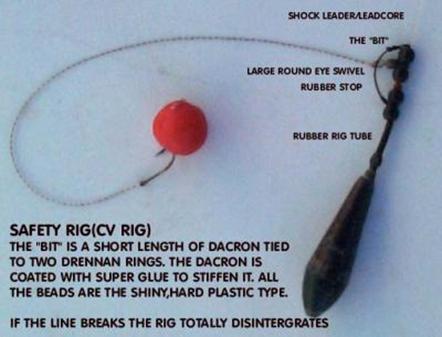
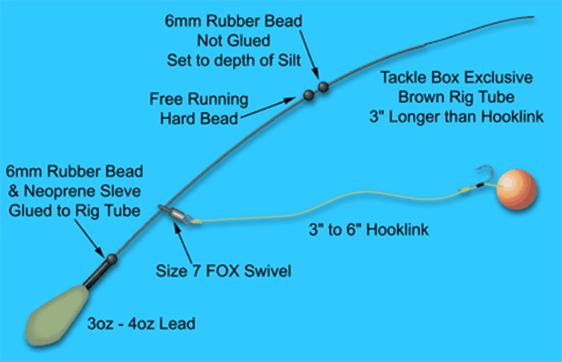
The Silt rig
The Silt rig is basically a Helicopter rig in it's make up, the only difference being that the rubber bead is slid up the anti-tangle tubing or lead-core to the depth of the silt that you are fishing in. In doing this the hook-link isn't pulled into the silt burying the hook-bait. To find out the depth of the silt you use a Marker-Float set-up with a length of white wool tied to the lead with the other end tied to the swivel which runs on the shock-leader/main-line. The link between the Marker-Float lead and the running swivel that is on the shock-leader/main-line must still be of a suitable breaking strain material with the wool accompanying it, not instead of it. Once set-up cast out to the silt and leave for ten minutes or so then reel in, the depth of the silt will be stained into the wool.
Considerations
The Helicopter/Silt rig does solve many problems, but not without having it's own inherent ones. Firstly when playing a hooked fish you do not have a direct pull on the fish, in other words the strain of the fish is being taken on the rubber bead or sleeve of the lead and the anti-tangle tubing or lead-core, not the direct tension of the main-line. Secondly the Helicopter/Silt rig is not particularly weed friendly, as it is prone to snagging. Once the lead is snagged the hook-link can slide up the anti-tangle tubing or lead-core making the problem worse, hence the need for a more direct pull and/or a safety-lead set-up. Finally, for fish safety, make sure that the rubber bead, which acts as a depth stop, can slide easily along the anti-tangle tubing or lead-core. In the event of your main-line snapping the hook-link must be able to slide up the anti-tangle tubing or lead-core pushing the rubber bead/depth stop with it as it slides off to free the fish from the lead


The Hinge Rig

Snake Bite Rig
Critically Balanced Rig

The Snowman Rig
Nail Rig
PopupRigOnMud
'Hinged, Pop-up, Stiff rig'
Pop-Up Rig
Helikopter-Rig
Amnesia D-rig
Scorpio-rig
The Lay-on Rig
Gravel Rigs
Roughorshallow Rig
Shocker Rig
Silt-rig
Wonderlijn
Bait Bag
Copyright © 2025 - Toate drepturile rezervate