|


 |  |
|
| |
 | Biologie | Chimie | Didactica | Fizica | Geografie | Informatica |
| Istorie | Literatura | Matematica | Psihologie |
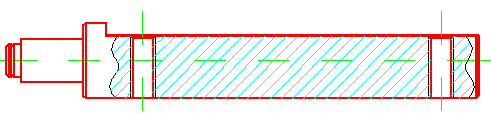
Sa se deseneze piesa din figura 2, utilizand straturile
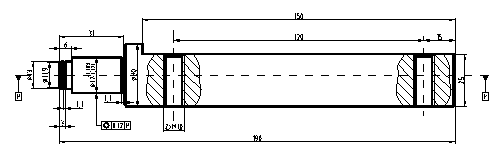
Se stabilesc cinci straturi, si anume:
startul linie groasa: tip linie - Continuous; culoare - rosie; grosime - 0,35 mm;
stratul linie subtire: tip linie - Continuous; culoare - negru; grosime - 0,09 mm;
stratul axa: tip linie - Dashdot; culoare - verde; grosime - 0,09 mm;
stratul hasuri: tip linie - continua; culoare - Cyan; grosime - 0,09 mm;
stratul cote: tip linie - continua; culoare - Blue; grosime - 0,09 mm;
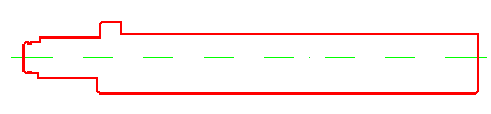
Stabilim strat curent: stratul Axa, si trasam axa de simetrie a piesei.
Command: Line
Specify first point: 50,148.5
Specify next point or [Undo]: 250,148.5
Specify next point or [Close/Undo]: enter
Modificam stratul curent in asa fel incat stratul Linie groasa sa devina strat curent, si desenam conturul piesei.
Command: Line
Specify first point: 55,148.5
Specify next point or [Close/Undo]: @0,5.5
Specify next point or [Close/Undo]: @1,1
Specify next point or [Close/Undo]: @0.9,0
Specify next point or [Close/Undo]: @0,-0.55
Specify next point or [Close/Undo]: @1.1,0
Specify next point or [Close/Undo]: @0,0.55
Specify next point or [Close/Undo]: @3,0
Specify next point or [Close/Undo]: @0,2
Specify next point or [Close/Undo]: @25,0
Specify next point or [Close/Undo]: @0,5.5
Specify next point or [Close/Undo]: @1,1
Specify next point or [Close/Undo]: @8,0
Specify next point or [Close/Undo]: @0,-5
Specify next point or [Close/Undo]: @150,0
Specify next point or [Close/Undo]: @0,-24
Specify next point or [Close/Undo]: @-1,-1
Specify next point or [Close/Undo]: @-158,0
Specify next point or [Close/Undo]: @-1,1
Specify next point or [Close/Undo]: @0,5.5
Specify next point or [Close/Undo]: @-25,0
Specify next point or [Close/Undo]: @0,2
Specify next point or [Close/Undo]: @-3,0
Specify next point or [Close/Undo]: @0,0.55
Specify next point or [Close/Undo]: @-1.1,0
Specify next point or [Close/Undo]: @0,-0.55
Specify next point or [Close/Undo]: @-0.9,0
Specify next point or [Close/Undo]: @-1,1
Specify next point or [Close/Undo]: c
Command: Line
Specify first point: 56,155
Specify next point or [Close/Undo]: @0,-13
Specify next point or [Close/Undo]: enter
Command: Line
Specify first point: 56.9,155
Specify next point or [Close/Undo]: @0,-13
Specify next point or [Close/Undo]: enter
Command: Line
Specify first point: 58,155
Specify next point or [Close/Undo]: @0,-13
Specify next point or [Close/Undo]: enter
Command: Line
Specify first point: 61,155
Specify next point or [Close/Undo]: @0,-13
Specify next point or [Close/Undo]: enter
Command: Line
Specify first point: 86,157
Specify next point or [Close/Undo]: @0,-17
Specify next point or [Close/Undo]: enter
Command: Line
Specify first point: 87,163.5
Specify next point or [Close/Undo]: @0,-30
Specify next point or [Close/Undo]: enter
Command: Line
Specify first point: 244,133.5
Specify next point or [Close/Undo]: @0,25
Specify next point or [Close/Undo]: enter
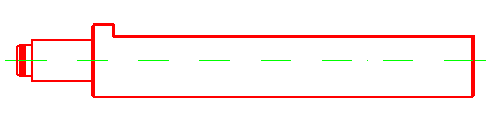
Pentru a lucra mai usor mutam UCS din punctul curent in punctul de coordonate 55,148.5, adica la intersectia dintre suprafata frontala din stanga a piesei si axa de simetrie a acesteia.
Command: UCS
Current UCS name: *World*
Enter an option [New/Move/ . .] <World>: m
Specify new origin point or [Zdepth] <0,0,0>: 55,148.5
Se schimba stratul curent pe stratul Axa, pentru a desena cele doua axe corespunzatoare gaurilor de M10 si apoi desenam axele respective.
Command: Line
Specify first point: 55,-20
Specify next point or [Close/Undo]: @0,40
Specify next point or [Close/Undo]: enter
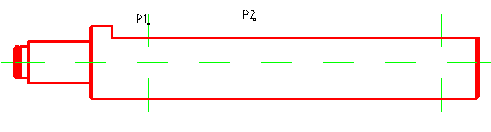
Command: Offset
Specify offset distance or [Through] <0>: 120
Select object to offset or <exit>: P1
Select point on side to offset: P2
Select object to offset or <exit>: enter
Pentru trasarea celor doua gauri de M10, vom considera ca gaura inainte de filetare are φ8. Se trece stratul curent pe stratul Linie groasa.
Command: Line
Specify first point: 51,-15
Specify next point or [Close/Undo]: @0,24
Specify next point or [Close/Undo]: @-1,1
Specify next point or [Close/Undo]: enter
Command: Line
Specify first point: 51,9
Specify next point or [Close/Undo]: @4,0
Specify next point or [Close/Undo]: enter
Se trece stratul curent pe stratul Linie subtire.
Command: Line
Specify first point: 50,10
Specify next point or [Close/Undo]: @0,-25
Specify next point or [Close/Undo]: enter
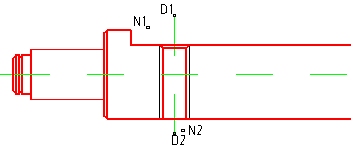
Command: Mirror
Select objects: w
Specify first corner: N1
Specify opposite corner: N2
Select objects: enter
Specify first point of mirror line: D1
Specify second point of mirror line: D2
Delete source objects? [Yes/No] <N>: enter
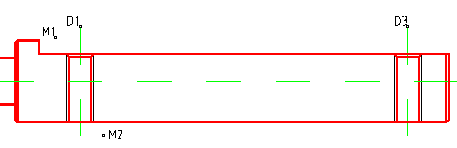
Pentru a desena si cea de-a doua gaura folosim comanda Copy.
Command: Copy
Select objects: w
Specify first corner: M1
Specify opposite corner: M2
Select objects: enter
Specify base point of displacement, or [Multiple]: D1
Specify second point of displacement or <use first point as displacement>: D3
Command: Spline
Specify first point or [Object]: T1
Specify next point: T2
Specify next point or [Close/Fit tolerance] <start tangent>: T3
Specify next point or [Close/Fit tolerance] <start tangent>: T4
Specify next point or [Close/Fit tolerance] <start tangent>: T5
Specify next point or [Close/Fit tolerance] <start tangent>: enter
Specify start tangent: enter
Specify end tangent: enter
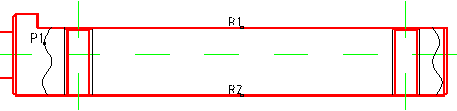
Command: Mirror
Select objects: P1
Selects objects: enter
Specify first point of mirror line: R1 - este mijlocul segmentului de dreapta
Specify second point of mirror line: R2
Delete source objects? [Yes/No] <N>: enter
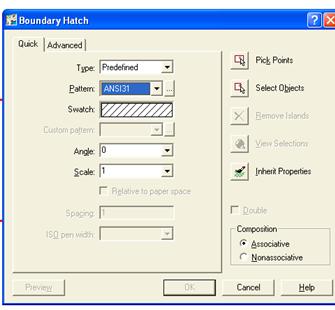
Se ingheata straturile Axa si Linie subtire si apoi se hasureaza cu comanda Bhatch, prin indicarea unui punct in interiorul zonei de hasurare. Se trece startul Hasuri ca strat curent.
Command: Bhatch - apare fereastra de dialog Boundary Hatch.
Din aceasta fereastra se modifica:
pattern: ANSI 31;
Pick points - se stabilesc trei puncte pentru cele trei zone interioare de hasurat (K1, K2 si K3).
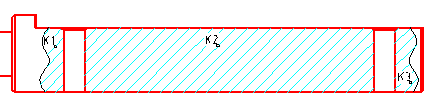
Dupa dezghetarea celor doua straturi, inghetate inainte de hasurare, avem desenul de executie al piesei, mai putin cotele.
Copyright © 2025 - Toate drepturile rezervate